
For steel pole footings, that matters. The concrete has to hold rag-bolt assemblies firmly enough for the bolts to reach their design capacity under wind load. In this guide, we explain what slump means, how the concrete slump test works, what the results tell you and the slump we recommend for pole foundations.
What Slump Means in Concrete
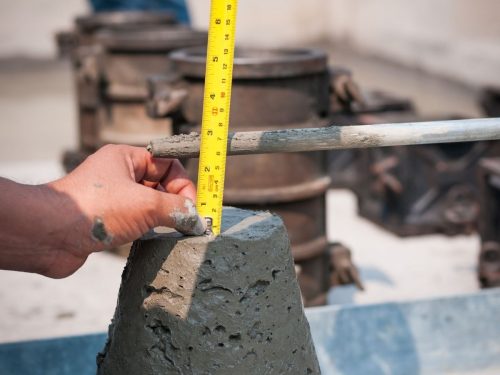
Slump refers to how far a cone-shaped sample of fresh concrete sinks, or subsides, once its mould is lifted away. It is measured in millimetres (mm). A low slump means a stiff, dry mix that holds its shape. A high slump means a wetter, more fluid mix that spreads and settles.
In practical terms, slump is a quick check of concrete workability, or how easily the mix can be placed and compacted. Our Foundations Concrete Mix guide sums it up simply: slump reflects the amount of water in the mix.
That is why slump is so closely linked to strength. Water makes concrete easier to work, but excess water weakens the hardened concrete and lowers its compressive strength. The goal is the right consistency for the job, not simply the easiest pour.
How Slump Appears on an Order
When you order concrete from a ready mix plant, slump is usually the third number in the specification. For example, a 32/20/80 mix means:
- 32: strength in megapascals (MPa), which relates to the amount of cement in the mix
- 20: the maximum size of the stone (blue metal) aggregate, in millimetres
- 80: the target slump, in millimetres
How the Concrete Slump Test Works
The concrete slump test is the most common quality control check for fresh concrete on Australian sites. It is set out in Australian Standard (AS) 1012.3.1, and it takes only a few minutes with simple equipment:
- a slump cone (sometimes called an Abrams cone), which is a steel mould 300 mm high with a 200 mm base and 100 mm top opening
- a steel tamping rod, 16 mm in diameter with a rounded end
- a flat, rigid, non-absorbent base plate
- a ruler or tape measure
The Slump Test, Step by Step
- Take a representative sample from the concrete delivery, ideally from the middle of the truck’s discharge.
- Dampen the cone and base plate, then stand firmly on the cone’s foot pieces to hold it in place.
- Fill the cone in three equal layers, rodding each layer 25 times with the tamping rod so it compacts evenly.
- Strike off the top portion level with the rim and clear away any spilled concrete from around the base.
- Lift the cone straight up, steadily and without twisting, in a few seconds.
- Stand the empty cone upside down beside the sample and measure the drop from the top of the cone to the centre of the slumped concrete.
That measurement is the slump value. Run the test promptly after sampling, because slump drops as the concrete starts to stiffen.
Reading Your Slump Test Result
How the concrete behaves once the cone is removed tells you as much as the number itself. There are three main shapes to look for.
| Slump Type | What you see | What it means |
| True Slump | The concrete subsides evenly and keeps roughly its cone shape | A cohesive, well-proportioned mix. This is the only result you should record as the slump value. |
| Shear Slump | The top portion slides away sideways, or one side shears off | The mix may lack cohesion or be an improperly mixed batch. Repeat the test with a fresh sample. If the concrete shears again, raise it with your supplier. |
| Collapse Slump | The concrete collapses completely and spreads out flat | The mix is very wet, or it is a high workability concrete designed to flow. Normal slump testing does not suit these mixes. |
At the other end of the scale is zero slump, where the concrete barely moves at all. Zero slump and other low workability mixes are used for jobs like extruded kerbs or constructing pavements with machinery, not for pole footings.
For self-compacting and very fluid mixes, a slump flow test is used instead. Rather than measuring the drop, you measure the diameter of the spread once the mix flows out across the base plate.
Typical Slump Ranges
There is no single good slump. The right target slump depends on how the concrete will be placed, how much reinforcement it has to flow around and how it will be compacted. As a general rule, the ranges below are a useful starting point.
| Slump | Workability | Typical Uses |
| 0 to 40 mm | Low | Dry mixes for machine-laid kerbs and pavements |
| 50 to 90 mm | Medium | Footings, slabs and general concrete construction with light reinforcement |
| 100 to 150 mm | High | Heavily reinforced sections, tight spaces and pumped concrete |
| Over 150 mm | Very High | Flowing mixes, usually made with admixtures |
Your engineer’s specification always takes priority over any typical figure. Ready mix suppliers also work to a tolerance either side of the ordered slump under AS 1379, so check the specified range on the delivery docket before the truck discharges.
Concrete Slump for Footings
For our steel pole foundations, we recommend a 32/20/80 concrete mix. That is 32 MPa strength, 20 mm aggregate and an 80 mm slump. This combination ensures the foundation bolts achieve their design capacity once the concrete has cured.
An 80 mm slump sits at the drier end of the 80 to 200 mm range set out in our Foundations Concrete Mix procedure. It gives you a mix that is:
- Workable enough to flow around the reinforcement cage and rag-bolt assembly without leaving voids
- Stiff enough to hold the bolt group in position while you check alignment and level
- Low in excess water, so the concrete reaches the compressive strength the pole design relies on
Why Higher Slump Is Risky
It can be tempting to order a wetter mix, or add water on site, to make a deep bored pier easier to fill. The problem is that extra water reduces strength. A footing that looks fine on the day may not deliver the anchorage your pole needs in a design wind event.
If your site genuinely needs a more fluid mix, ask your supplier about water reducers. These admixtures increase slump without adding water, so the mix flows better while keeping its strength.
For footing dimensions, bolt setting and pile or pad options, see our Footings & Ragbolts procedure.
Getting Slump Right on Site
The slump you order is not always the slump you pour. Fresh concrete stiffens over time, and Australian conditions can speed that up. Keep these points in mind:
- Plan around hot days: Heat and wind draw moisture out of the mix, so slump drops faster between batching and placement.
- Allow for travel time: When concrete has to travel a great distance from the ready mix plant, schedule deliveries so each load arrives ready to place.
- Test before you pour: A quick slump test on arrival confirms the load is within the specified range before it goes into the footing.
- Place it promptly: Our procedure recommends placing and compacting immediately after mixing, so the mix is used before its initial set.
Placing and Curing the Footing
Once the slump checks out, how you place the concrete matters just as much. We recommend placing footing concrete in layers 100 to 300 mm thick, depending on the foundation’s size and shape, and compacting each layer with a mechanical vibrator before adding the next. This expels air bubbles and produces dense concrete free from honeycombing.
Then keep the concrete continuously damp. Curing should generally continue for seven to ten days, and longer in cold weather when cement hardens more slowly. Efficient curing improves both impermeability and durability.
Build Footings That Last
The right slump is one small part of a footing that performs for decades. For more than 55 years, we have designed and supplied galvanised steel poles, rag-bolt assemblies and precast bases for projects right across Australia. Our project services cover structural design, drafting, installation and on-site pole erection, so your foundations and poles are engineered to work together.
Planning a lighting, CCTV or power pole project? Contact us or call to talk through your footing and pole requirements.
Frequently Asked Questions
Slump is how far a sample of fresh concrete settles after the slump cone is lifted away, measured in millimetres. It shows how workable the mix is and gives a good indication of how much water it contains. A higher slump means a wetter, more fluid mix.
For G&S steel pole foundations, we recommend a 32/20/80 mix with an 80 mm slump. It flows well around rag bolts and reinforcement while keeping the strength the bolts need to reach their design capacity. Always follow your engineer's specification if it differs.
We advise against it. Excess water raises slump but reduces the strength and durability of the hardened concrete. If you need a more workable mix, talk to your supplier about adjusting the design or using water reducers before the concrete is delivered.
A low slump means the concrete is stiff and dry, with low workability. Low slump mixes suit jobs like machine-laid pavements, but they are harder to compact in deep footings. Placed without enough vibration, they can leave voids around the bolt group.
A collapse slump usually means the mix is much wetter than specified, unless it was designed as a flowing, high-workability concrete. For a standard footing mix, don't pour it. Check the delivery docket against your order and contact the supplier before placing any concrete.